问题描述
在使用 Burp Suite 进行 DVWA 渗透测试时,遇到以下问题:
- 浏览器访问
http://localhost/dvwa时,Burp Suite 无法拦截请求 - HTTP History 中看不到任何 localhost 的请求记录
- Target → Site map 中可能显示 localhost,但没有具体路径
- 访问其他外部网站(如
http://example.com)可以正常拦截
根本原因
Chrome/Edge 等浏览器有内置的安全机制:即使配置了代理插件(如 SwitchyOmega),默认情况下也会自动绕过对 localhost 和 127.0.0.1 的代理。
这是浏览器的默认行为,用于优化本地开发环境的性能,但会导致无法通过 Burp Suite 拦截本地请求。
完整解决方案
需要同时应用以下三个方案才能彻底解决问题:
方案 A:修改 Chrome 启动参数(禁用 localhost 代理绕过)
方案 B:配置 Hosts 文件使用自定义域名
方案 C:正确配置 Burp Suite 拦截规则
方案 A:修改 Chrome 启动参数
步骤 1:关闭所有 Chrome 进程
- 完全关闭 Chrome 浏览器(点击右上角的 X)
- 打开任务管理器(
Ctrl + Shift + Esc) - 查找所有
chrome.exe进程 - 右键点击每个进程,选择 “结束任务”
- 确保没有任何 Chrome 后台进程在运行
步骤 2:创建 Chrome 快捷方式
找到 Chrome 的安装位置,通常是:
1
C:\Program Files\Google\Chrome\Application\chrome.exe
或
1
C:\Program Files (x86)\Google\Chrome\Application\chrome.exe
右键点击
chrome.exe,选择 “创建快捷方式”将快捷方式移动到桌面或其他方便访问的位置
步骤 3:修改快捷方式属性
右键点击刚创建的快捷方式
选择 “属性”
在 “目标” 字段中,找到现有的路径,例如:
1
"C:\Program Files\Google\Chrome\Application\chrome.exe"
在路径后面添加以下参数(注意有空格):
1
--proxy-bypass-list="<-loopback>"
完整的目标应该类似:
1
"C:\Program Files\Google\Chrome\Application\chrome.exe" --proxy-bypass-list="<-loopback>"
点击 **”应用”**,然后点击 “确定”
步骤 4:通过新快捷方式启动 Chrome
- 重要:不要通过任务栏或其他方式启动 Chrome
- 只能通过刚才修改的快捷方式启动
- 启动后,Chrome 将不再绕过 localhost 的代理
验证方法
启动 Chrome 后,在地址栏输入:
1 | chrome://version |
在 “命令行” 部分,应该能看到 --proxy-bypass-list="<-loopback>" 参数。
方案 B:配置 Hosts 文件使用自定义域名
为什么需要这个方案
即使禁用了浏览器的代理绕过,某些情况下 localhost 仍然可能有问题。使用自定义域名可以彻底避免这个问题。
步骤 1:编辑 Hosts 文件
以管理员身份打开记事本:
- 点击开始菜单
- 搜索 “记事本”
- 右键点击 “记事本”
- 选择 “以管理员身份运行”
在记事本中,点击 “文件” → “打开”
导航到以下路径:
1
C:\Windows\System32\drivers\etc
在文件类型下拉菜单中,选择 “所有文件 (.)”
找到并打开 hosts 文件(没有扩展名)
步骤 2:添加自定义域名映射
在 hosts 文件的最后一行添加:
1 | 127.0.0.1 dvwa.local |
完整的 hosts 文件内容示例:
1 | # Copyright (c) 1993-2009 Microsoft Corp. |
步骤 3:保存文件
- 点击 “文件” → “保存”
- 关闭记事本
步骤 4:刷新 DNS 缓存
打开命令提示符(Win + R,输入 cmd),执行:
1 | ipconfig /flushdns |
你应该看到:
1 | Windows IP 配置 |
步骤 5:验证配置
在命令提示符中执行:
1 | ping dvwa.local |
应该显示:
1 | 正在 Ping dvwa.local [127.0.0.1] 具有 32 字节的数据: |
步骤 6:修改 DVWA 访问地址
从现在开始,不要访问:
1 | http://localhost/dvwa |
而是访问:
1 | http://dvwa.local/dvwa |
方案 C:正确配置 Burp Suite 拦截规则
问题说明
即使浏览器代理配置正确,如果 Burp Suite 的拦截规则配置不当,仍然无法拦截请求。
关键配置点
❌ 错误配置
如果勾选了 **”And URL is in target scope”**,Burp 只会拦截在 Target Scope 中的 URL。如果 dvwa.local 不在 Scope 中,请求将不会被拦截。
✅ 正确配置
步骤 1:进入 Proxy Settings
- 在 Burp Suite 中,点击 Settings(或旧版本中的齿轮图标)
- 在左侧导航中,选择 Tools → Proxy
- 找到 Request interception rules 部分
步骤 2:配置拦截规则
必须勾选:
- ✅ Intercept requests based on the following rules
- 这个选项必须启用,否则拦截功能不工作
必须取消勾选:
- ❌ And URL is in target scope
- 取消这个选项,允许拦截所有请求,不受 Scope 限制
可选勾选(推荐保留):
✅ Or File extension Does not match
- 条件:
^gif$|^jpg$|^png$|^css$|^js$|^ico$... - 说明:不拦截图片、CSS、JS 等静态资源
- 条件:
✅ Or Request Contains parameters
- 说明:拦截包含参数的请求(如登录请求)
✅ Or HTTP method Does not match
- 条件:
get|post - 说明:只拦截 GET 和 POST 请求
- 条件:
步骤 3:推荐的拦截规则配置
最终的拦截规则配置应该如下:
| Enabled | Operator | Match type | Relationship | Condition |
|---|---|---|---|---|
| ✅ | Or | File extension | Does not match | `^gif$ |
| ✅ | Or | Request | Contains parameters | - |
| ✅ | Or | HTTP method | Does not match | `get |
| ❌ |
步骤 4:配置Burp Suite的proxy标签的 Response Interception Rules
在 Response interception rules 部分,类似配置:
必须勾选:
- ✅ Intercept responses based on the following rules
推荐配置:
- ✅ Or Content type header Matches →
text - ✅ And Request Was intercepted
- ✅ And Status code Does not match →
^304$ - ❌ And URL is in target scope(取消勾选)
配置完成后proxy配置是这样的: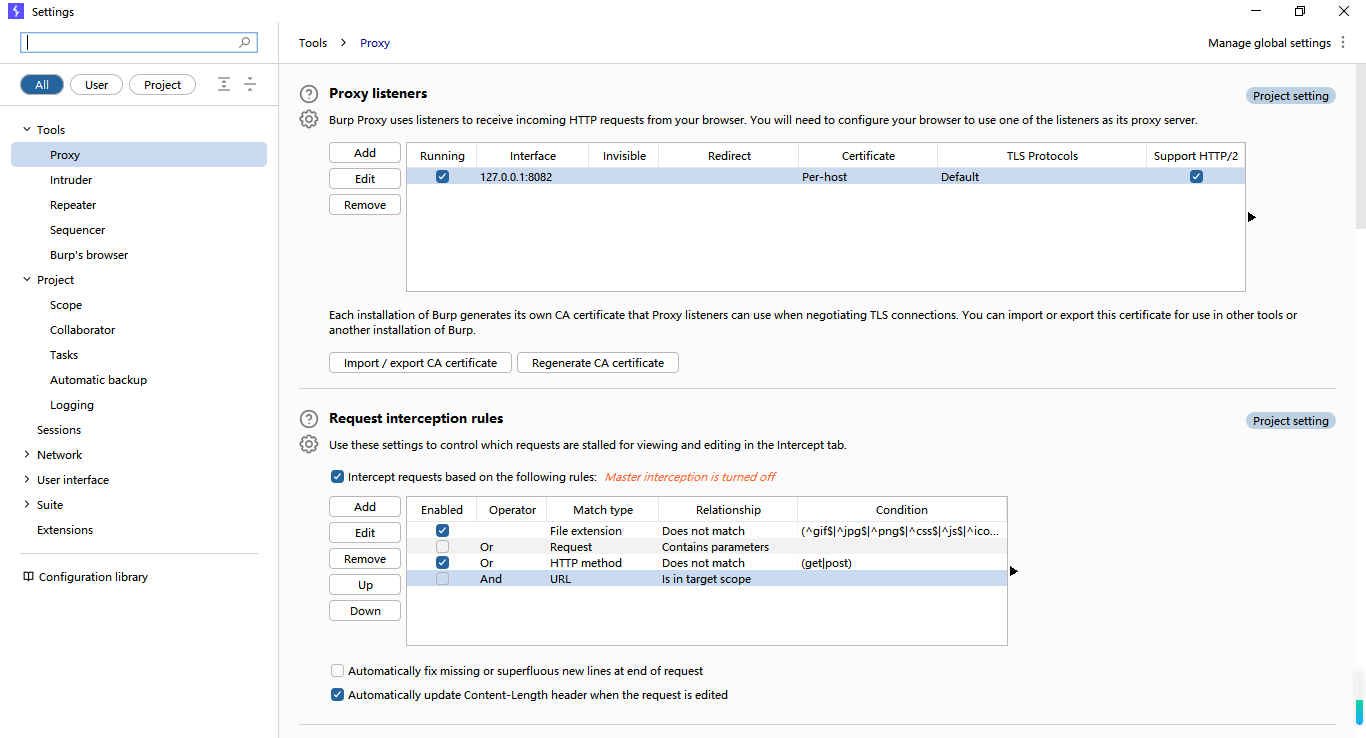
—分割线—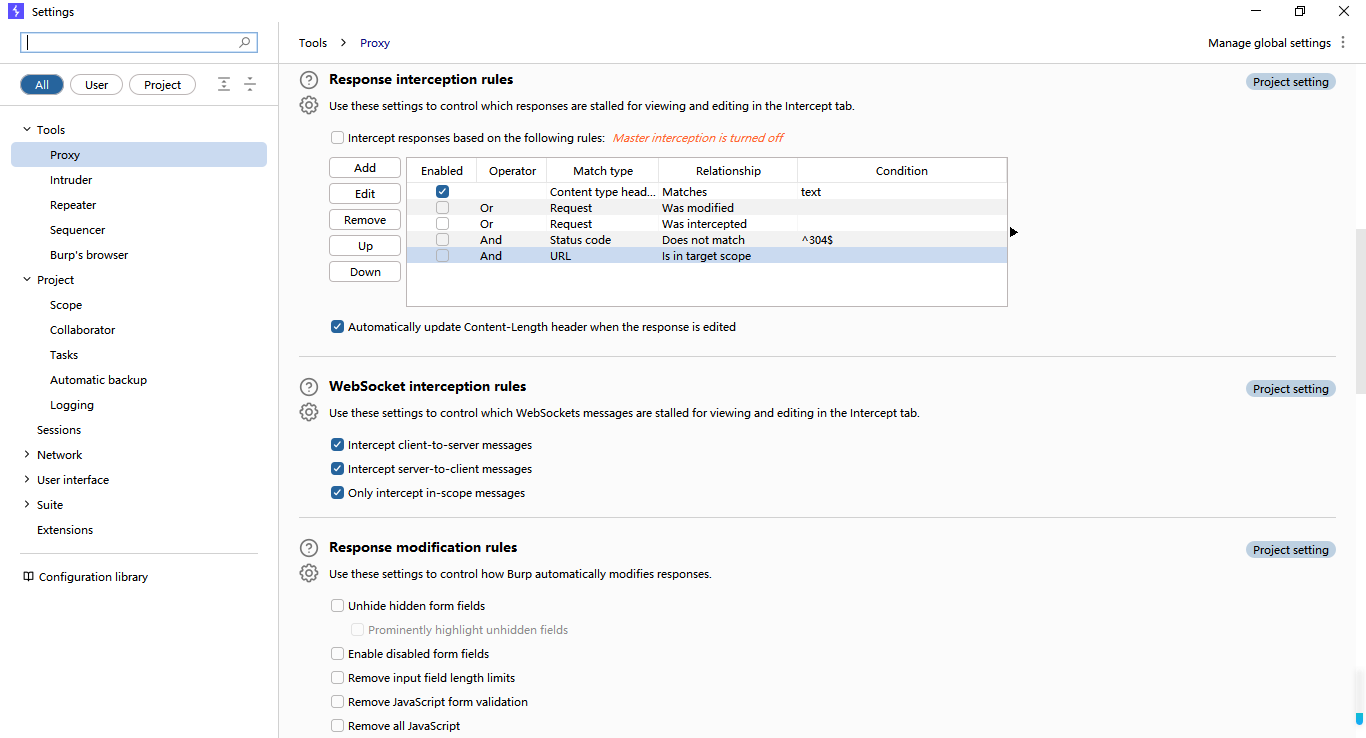
—分割线—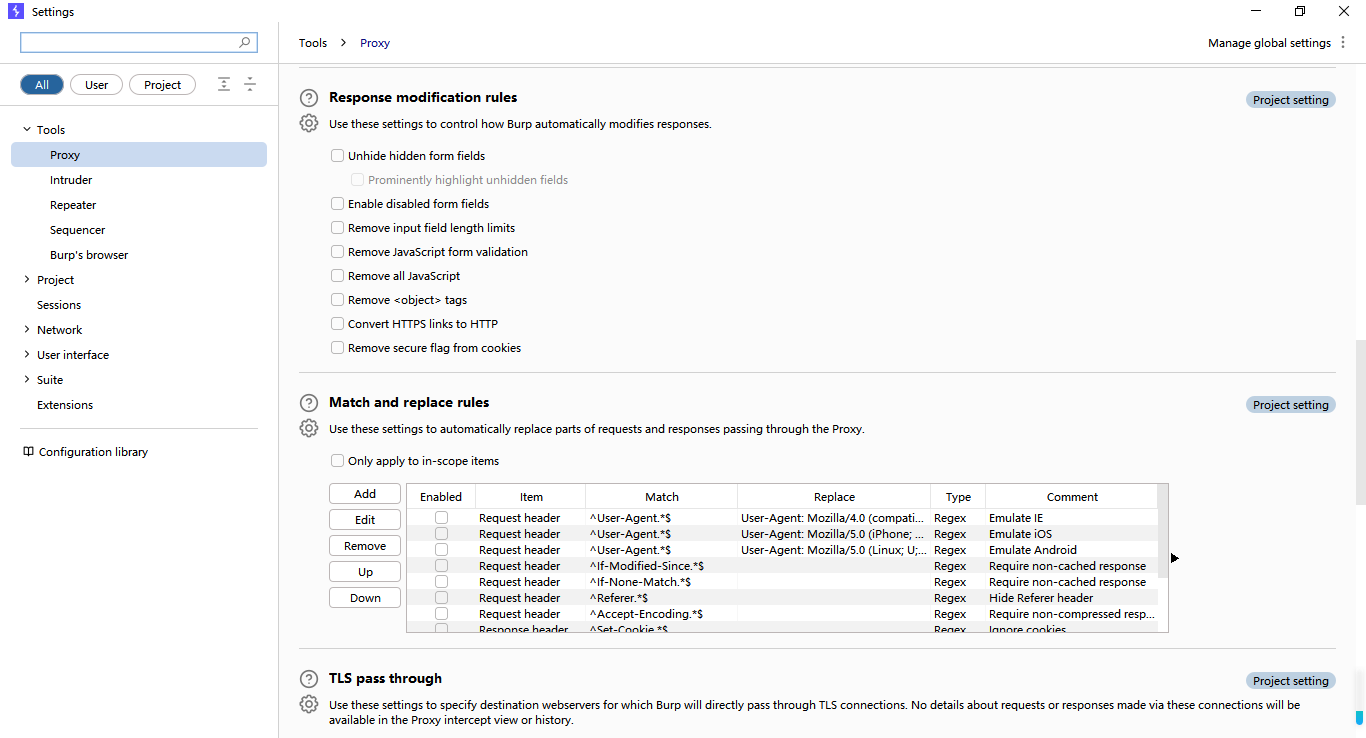
—分割线—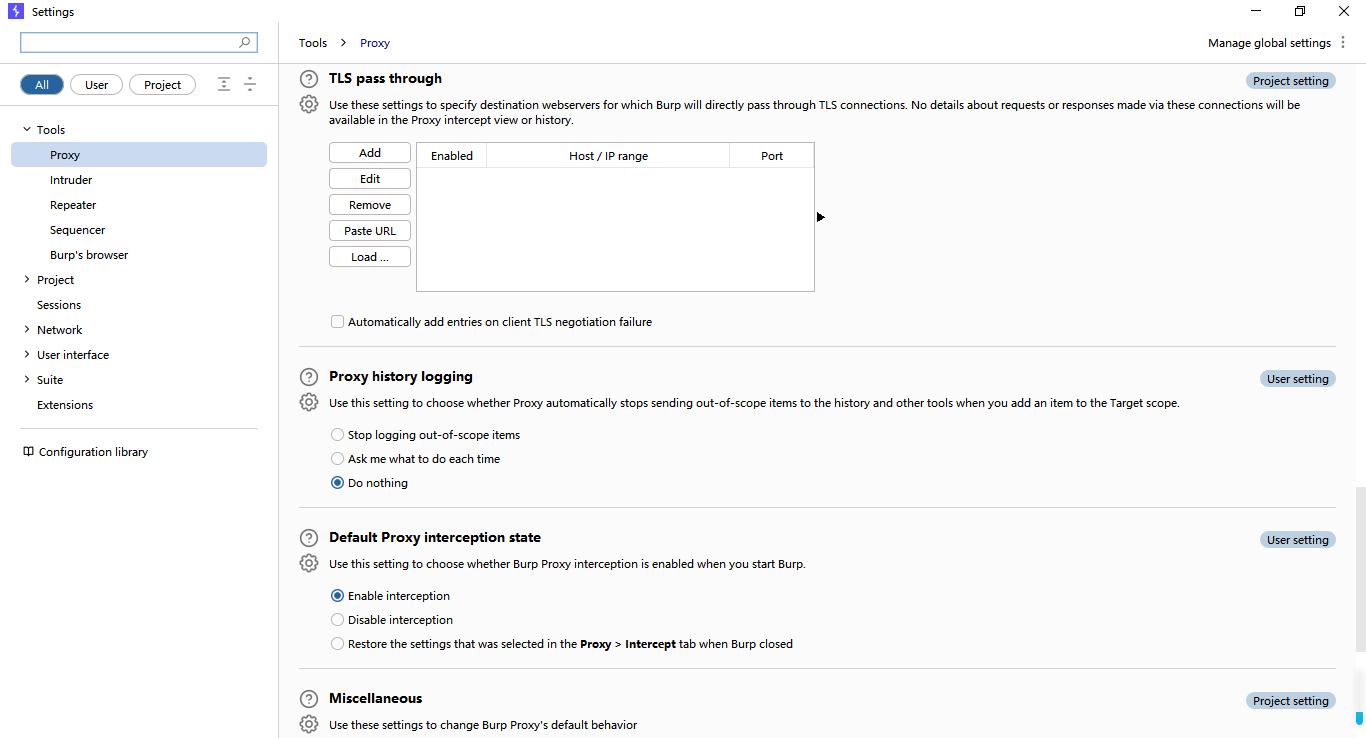
—分割线—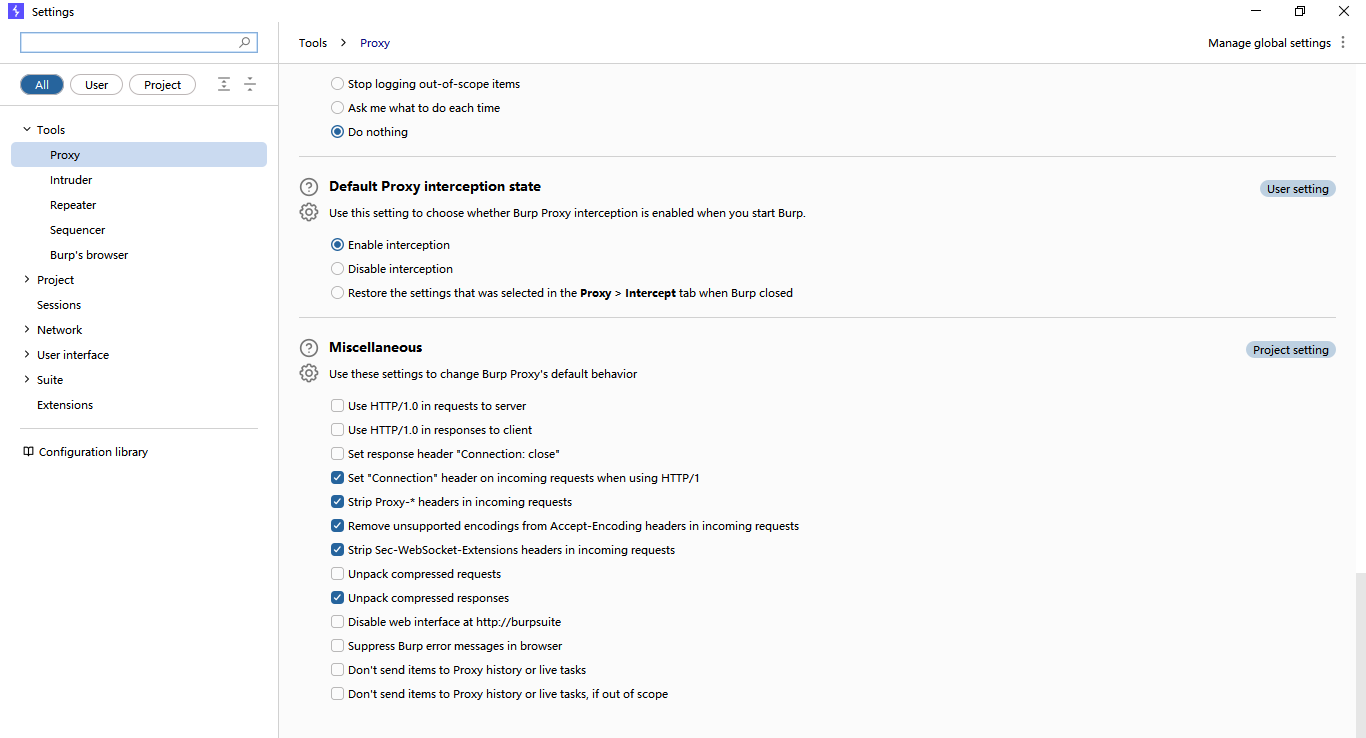
步骤 5:浏览器配置如下:
1.代理端口号需要和proxy配置中的Proxy listeners一致
2.不代理的地址列表不能有localost或者127.0.0.1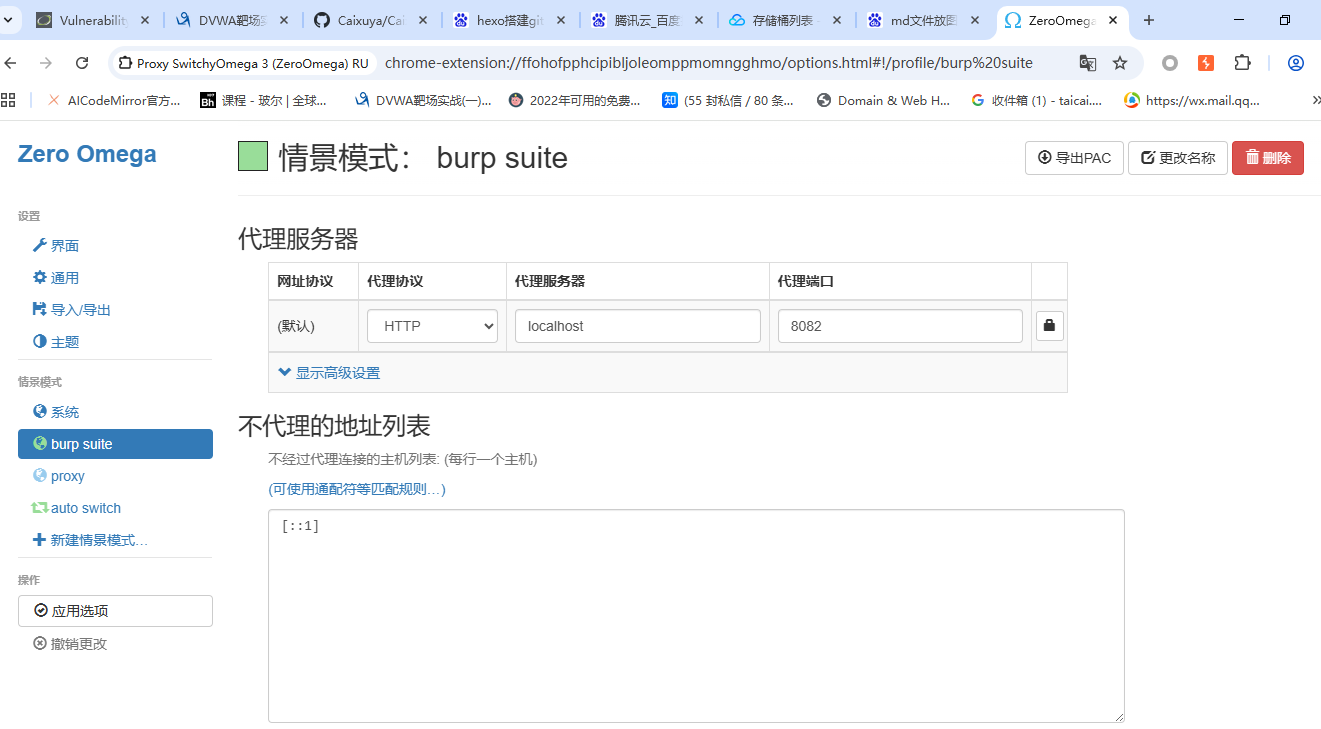
步骤 6:Burp Suite的Proxy标签的HTTP history的filter配置:
1.需要勾选上HTML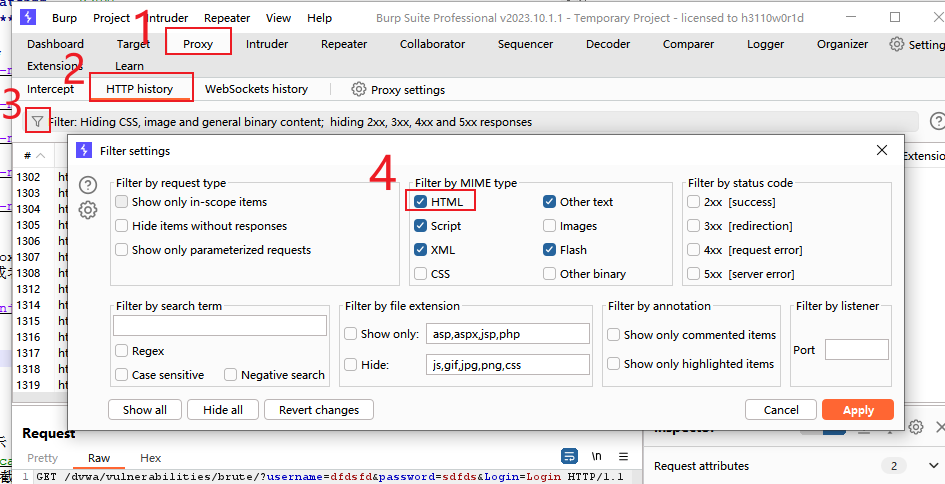
步骤 7:保存并测试
- 配置完成后,关闭 Settings 窗口
- 确保 Proxy → Intercept 显示 “Intercept is on”
- 在浏览器中访问
http://dvwa.local/dvwa - 应该能在 Burp Suite 中看到被拦截的请求
完整验证流程
第一步:验证基础配置
- ✅ Burp Suite Proxy 监听在
127.0.0.1:8082 - ✅ SwitchyOmega 配置代理为
localhost:8082 - ✅ 浏览器当前使用 “burp suite” 情景模式
第二步:验证 Chrome 启动参数
- 通过修改后的快捷方式启动 Chrome
- 访问
chrome://version - 确认命令行中包含
--proxy-bypass-list="<-loopback>"
第三步:验证 Hosts 配置
- 在命令提示符中执行:
ping dvwa.local - 确认解析到
127.0.0.1
第四步:验证 Burp 代理工作
- 在浏览器中访问
http://burp - 应该看到 “Welcome to Burp Suite Professional” 页面
- 如果能看到,说明代理正常工作
第五步:验证拦截功能
- 在 Burp Suite 中,确保 Intercept is on
- 在浏览器中访问
http://dvwa.local/dvwa - 应该在 Burp Suite 的 Intercept 标签中看到请求被拦截
第六步:完整测试
- 在 DVWA 登录页面输入用户名和密码
- 点击 Login 按钮
- 在 Burp Suite 中应该能看到:
1
2GET /dvwa/vulnerabilities/brute/?username=xxx&password=xxx&Login=Login
Host: dvwa.local
故障排查
问题 1:Chrome 启动参数不生效
症状:
- 在
chrome://version中看不到--proxy-bypass-list参数
原因:
- 可能有其他 Chrome 进程在后台运行
- 没有通过修改的快捷方式启动
解决方案:
- 打开任务管理器,结束所有
chrome.exe进程 - 确保只通过修改的快捷方式启动 Chrome
- 不要点击任务栏上的 Chrome 图标
问题 2:Hosts 文件修改不生效
症状:
ping dvwa.local无法解析或解析错误
原因:
- Hosts 文件格式错误(多余的空格、Tab 等)
- DNS 缓存未刷新
- 没有管理员权限保存
解决方案:
确保 hosts 文件格式正确:
1
127.0.0.1 dvwa.local
(IP 和域名之间至少一个空格)
执行:
1
ipconfig /flushdns
以管理员身份重新编辑和保存 hosts 文件
问题 3:Burp 仍然拦截不到请求
症状:
- 访问
http://burp可以看到欢迎页面 - 但访问
http://dvwa.local/dvwa拦截不到
可能原因与解决方案:
原因 A:Intercept 规则配置错误
检查:
- 进入 Settings → Tools → Proxy
- 找到 Request interception rules
- 确认 ✅ “Intercept requests based on the following rules” 已勾选
- 确认 ❌ “And URL is in target scope” 未勾选
原因 B:浏览器缓存问题
解决:
- 清除浏览器缓存(
Ctrl + Shift + Delete) - 重启浏览器
- 再次测试
原因 C:HTTPS 重定向
解决:
- 确保访问的是
http://dvwa.local(HTTP,不是 HTTPS) - 如果自动跳转到 HTTPS,需要配置 Burp 的 HTTPS 拦截
问题 4:dvwa.local 无法访问
症状:
- 浏览器显示 “无法访问此网站” 或 “ERR_CONNECTION_REFUSED”
原因:
- DVWA 服务器未启动
- Apache/Nginx 没有配置虚拟主机
解决方案:
配置 Apache 虚拟主机(可选)
编辑 Apache 配置文件(如
httpd.conf或httpd-vhosts.conf)添加虚拟主机配置:
1
2
3
4
5
6
7
8
9<VirtualHost *:80>
ServerName dvwa.local
DocumentRoot "C:/xampp/htdocs"
<Directory "C:/xampp/htdocs">
Options Indexes FollowSymLinks
AllowOverride All
Require all granted
</Directory>
</VirtualHost>重启 Apache 服务
最佳实践建议
1. 同时使用三个方案
推荐组合:
- ✅ Chrome 启动参数(
--proxy-bypass-list="<-loopback>") - ✅ Hosts 文件配置(
dvwa.local) - ✅ Burp 拦截规则配置(取消勾选 Scope 限制)
这样可以确保:
- Chrome 不会绕过本地代理
- 使用自定义域名避免 localhost 特殊处理
- Burp 能拦截所有请求
2. 创建专用的 Chrome 配置文件
为渗透测试创建单独的 Chrome 配置文件:
1 | "C:\Program Files\Google\Chrome\Application\chrome.exe" --user-data-dir="C:\ChromePentest" --proxy-bypass-list="<-loopback>" |
这样可以避免影响日常使用的 Chrome 配置。
3. 使用 Firefox 替代方案
如果 Chrome 配置太麻烦,可以使用 Firefox:
- Firefox 对代理的支持更好
- 不会自动绕过 localhost
- 配置相对简单
4. 固定 Burp 监听端口
统一使用固定端口(如 8082),避免频繁修改配置。
配置检查清单
在开始渗透测试前,确保以下所有项都已正确配置:
Chrome 配置
- 已创建带启动参数的快捷方式
- 快捷方式包含
--proxy-bypass-list="<-loopback>" - 通过该快捷方式启动 Chrome
- 在
chrome://version中确认参数生效
Hosts 配置
- 以管理员身份编辑 hosts 文件
- 添加
127.0.0.1 dvwa.local条目 - 保存文件
- 执行
ipconfig /flushdns - 用
ping dvwa.local验证
Burp Suite 配置
- Proxy Listener 运行在 127.0.0.1:8082
- ✅ “Intercept requests based on the following rules” 已勾选
- ❌ “And URL is in target scope” 未勾选
- Intercept is on(拦截已开启)
SwitchyOmega 配置
- 代理服务器:localhost:8082
- 不代理列表只包含
[::1] - 当前情景模式:burp suite
验证测试
- 访问
http://burp能看到欢迎页面 - 访问
http://dvwa.local/dvwa能看到 DVWA - 登录操作能被 Burp 拦截
- HTTP History 中能看到请求记录
总结
解决 Burp Suite 无法拦截 localhost 请求的完整方案包括:
修改 Chrome 启动参数
- 添加
--proxy-bypass-list="<-loopback>"参数 - 禁用浏览器对 localhost 的代理绕过
- 添加
配置 Hosts 文件
- 添加
127.0.0.1 dvwa.local映射 - 使用自定义域名访问 DVWA
- 添加
正确配置 Burp 拦截规则
- 勾选 “Intercept requests based on the following rules”
- 取消勾选 “And URL is in target scope”
- 可选勾选 “Or HTTP method Does not match”
这三个方案必须同时应用才能彻底解决问题。
附录:其他浏览器配置
Microsoft Edge
Edge 基于 Chromium,配置方法与 Chrome 相同:
1 | "C:\Program Files (x86)\Microsoft\Edge\Application\msedge.exe" --proxy-bypass-list="<-loopback>" |
Firefox
Firefox 对代理支持较好,通常不需要特殊配置:
- 打开 Firefox 设置
- 搜索 “代理”
- 选择 “手动代理配置”
- HTTP 代理:
127.0.0.1,端口:8082 - 勾选 “也将此代理用于 HTTPS”
- 不要在 “不使用代理” 中添加 localhost
文档版本:1.0
最后更新:2025-11-19
适用环境:Windows 10/11 + Chrome/Edge + Burp Suite Professional/Community

